Ratatouille: The case for Smell-o-vision
Ratatouille. Conjured in savory memories, it’s a fragrant eggplant-basil-and-tomato-y meal, served with crusty bread and a big glass of house red wine at a laid-back Montmartre bistro. It’s 1987, and I’m with my girlfriend Woodford Reserve (on the rocks with a splash of spring water) knocking around Paris.

Me (far right) with my gal Woodford Reserve’s parents (Bob & Penny Miller) and their famous friends: Paul Levy, Michael Holroyd, Margaret Drabble, and Georgia Levy. England, summer 1987
We were in France and England during the summer between high school and college, and thanks to her parents’ superb restaurant picks, progressive ideas and generous wallet we travelled, and ate, and drank very well on our jaunt. Well, better than I did for many years to follow, anyway.
Paris, 1987.
Fast forward to 2007. Over 20 years, I’ve finally (in my humble opinion) mastered a pretty kick-ass ratatouille in my home kitchen, a fact of which I’m inordinately proud. I revel in finding the perfect glossy eggplant, the juiciest yet firmest plum tomatoes, and most gorgeous zucchini my garden or the market has to offer. It’s wonderful atop a graceful swirl of pasta or buttery mound of polenta; or served as I remembered it in France, sopped up from a shallow bowl with generous crusts of bread. For the longest time, my kids thought it was just another chunky pasta sauce; and until Sprite started eating only white food in first grade, both boys ate it all the time without question.
And then along came Thomas Fecking Keller. Mastermind chef behind the food styling for Disney/Pixar’s 2007 film Ratatouille.
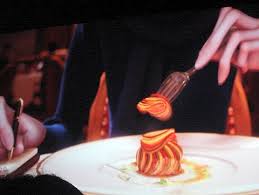
Ratatouille “All Stacked Up” in the movie.
Don’t get me wrong. I will eat Keller’s food whenever I get the chance. And, I LOVE this movie. I love the theme behind it; that “anyone can cook.” I love the message—even preschoolers get it—that great soul-and-body nourishing food is about balance and flavor and freshness, not about how fast you can get it from a cardboard container into your mouth. I love that drinking the occasional glass of wine by reasonable adults is neither demonized nor glorified; it’s just part of enjoying a great meal. I love that the main female character is a culinary badass and has short hair, clogs, keeps her clothes on for the entire movie, and does NOT sing a goddamn peep.
And I loved hearing my children say as the credits rolled, “Mom, let’s make ratatouille!”
I spent all day with them making it: chopping, then individually sautéing each vegetable until just al dente. We gently folded each perfectly cooked vegetable into an enameled Dutch oven, then covered it with parchment paper and slowly roasted it at a low temperature for most of the afternoon. My boys took one look at the glorious results and said, “what’s THAT? ”
They were expecting Thomas Fecking Keller’s version: as they call it “Ratatouille, all stacked up.” Which I eventually figured out how to make, and it’s also pretty kick-ass. But now they expect EVERY thing in our tiny kitchen to come out plated as beautifully as a goddamn Bon Appétit feature spread. When I told this story to my buddy French 75, he said “what did you expect? You brought this shit down on yourself.”
And I totally did.
I entirely support the notion that you eat with your eyes first, and that a beautifully composed plate should be at every meal served at our table. It really doesn’t take that much longer to orient your vegetables attractively and put a little saucy swirl and some herbs on the plate, and I think in the long run it makes great food more attractive, accessible and approachable for more people. Especially the shorties.
I just wish I didn’t feel backed into a corner to do so by a little rat named Remy, who’s possessed by a plating genius. Fecking Keller.
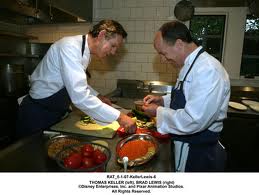
Thomas Keller (left) constructing the ratatouille dished used for the film.
Ratatouille “All Stacked Up” (serves 4)
Keller’s version is a gorgeous layered casserole, which he then deconstructs for plating. That’s beautiful and awesome, and is a great way to make this recipe, too. I use 4” round mini springform pans with removable bases to bake the vegetable layers in, which the kids love to pack themselves for individual flavor preferences. I also add mozzarella cheese and sometimes a sprinkling of Panko to this dish, even though it’s not at all authentic (hell, nothing about this is authentic, so why stop there?) It just makes it more gooey, crunchy, and yummy.
4 Tbs olive oil (plus more for drizzling)
3 cloves garlic, sliced
1 medium eggplant
1 medium zucchini
1 medium yellow squash
3-4 plum tomatoes
1 red bell pepper, cored
1 medium onion
2 medium balls fresh mozzarella (or 1 cup shredded mozzarella)
1 small bunch basil leaves (12-16 large leaves)
½ cup Panko (Japanese bread crumbs) – optional

Ratatouille towers, ready to go in the oven (I hadn’t added the Panko yet).
Slice the eggplant into very thin (as thin as possible) rounds. Spread in an even layer on a rimmed cookie sheet and sprinkle generously with kosher or sea salt (about 2 tablespoons). Let sit for about 20 minutes, then turn over the eggplant slices and sprinkle with a bit more salt. Let rest for another after 20 minutes.
Meanwhile, slice all of the remaining vegetables cross-wise with a very sharp knife or mandolin, making your rounds as thin as possible. Sprinkle all of the vegetable slices with sea salt and freshly ground black pepper. Slice the mozzarella balls into thin rounds (or crumble) if using fresh cheese.
Preheat an oven to 350 degrees.
Remove the eggplant slices from the rimmed cookie sheet, and squeeze gently to remove as much liquid and salt as possible. Don’t worry about completely removing the salt from the eggplant slices, it will add great flavor to your dish. Wipe all the excess liquid from the cookie sheet.
In a large cast iron skillet, heat about 2 Tbs. oil over medium heat. Add garlic slices and stir constantly to avoid burning; when the garlic starts to soften and brown (but not burn!) remove it from the oil with a slotted spoon and set aside in a small bowl. In batches of 3-4 slices of eggplant per time (so as not to crowd your skillet), add eggplant to the oil and cook gently until slightly softened on each side and just starting to brown. Repeat with remaining eggplant slices, adding more oil if needed.
Slightly oil the rimmed cookie sheet with olive oil. Place four 4” mini springform pans WITH THE BASES REMOVED on the sheet pan, spacing equally. Starting with a slice of eggplant on the bottom, fill each pan (or stack) with equal parts of each vegetable type and basil leaves, alternating layers of each type of veggie, and layering about halfway through with half of the cheese. Put more cheese near the top layer, and press down gently as you go to compress the layers as much as possible. If using springform pans, really pack those suckers full, the veggies will cook down quite a bit. Drizzle the top of each tower with about 1 tsp. olive oil, the reserved garlic slivers, and sprinkle on top about 1 tablespoon Panko if you like a little crispy accent.
Place on the center rack of your oven and bake for 35-40 minutes, or until brown on top and bubbly. Remove from oven and let cool for about 5 minutes to let layers settle. To plate, slide a wide spatula underneath the tower (or underneath the edge of the pan), gently wiggling to make sure the eggplant is not stuck to the cookie sheet. Run a small sharp knife around the inside edge of the springform pan to prevent sticking, then gently slide the spatula-laden tower to your serving plate; pull the spatula free from under the tower, then pull the springform pan straight up to release that baby onto your plate. Garnish with a drizzle of oil from the pan and a sprig of basil.
Now grab a big glass of wine – you deserve it!